





Tying cards
Learn to tie
Nine knots, four to six steps each: the same cards that come with our tie-your-own cords. A shoelace or any piece of string will do for practice.
No. 01
Reef Knot
Joins two ends of the same line, the classic knot for tying a bundle or a parcel. Shop the Reef pieces
No. 01 · Reef Knot
-
 Step 1 / 5
Right over left
Hold one end in each hand and cross the right (blue) end over the left (tan) end.
-
 Step 2 / 5
Under and up
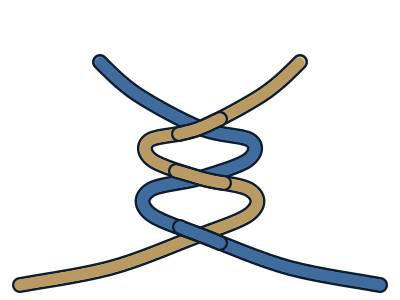
Wrap the blue end under the tan end and bring it back up; this is a half knot, and each end returns to its own side.
-
 Step 3 / 5
Left over right
Now cross the end on the left (tan) over the end on the right (blue).
-
 Step 4 / 5
Under and through
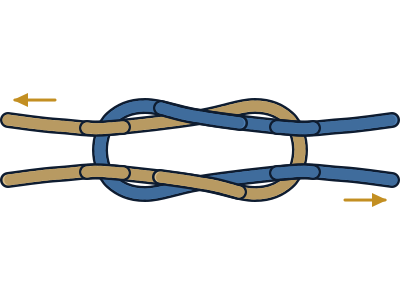
Wrap the tan end under the blue end and up through the opening, then lay the knot flat: each line now forms a U-shaped bight, and the two bights are hooked through each other.
-
 Step 5 / 5
Pull tight
Pull both lines to close the bights. Both tan parts leave on one side and both blue parts on the other, each pair lying over the other bight; if one part of a pair runs over and the other under, it is a granny knot.
No. 02
Figure Eight
A stopper knot: tied at the end of a line so it cannot slip back through a hole or a block. Shop the Figure Eight pieces
No. 02 · Figure Eight
-
 Step 1 / 5
Make a loop
Lay the working end over the standing part to form a loop.
-
 Step 2 / 5
Around the back
Bring the working end around and pass it under the standing part.
-
 Step 3 / 5
Down through the loop
Bring the end back over the side of the loop and push it down through the loop from the front.
-
 Step 4 / 5
Check the figure eight
Draw the end through; the rope should trace a figure 8 with four crossings, over and under in turn.
-
 Step 5 / 5
Tighten
Pull the standing part and the end to snug the knot, leaving a short tail.
No. 03
Bowline
Makes a fixed loop at the end of a line that will not slip or jam, and is easy to untie. Shop the Bowline pieces
No. 03 · Bowline
-
 Step 1 / 5
Make a small loop
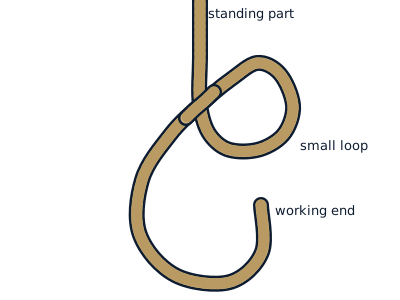
Form a small loop in the standing part, with the part leading to the working end lying on top.
-
 Step 2 / 5
Up through the loop
Bring the working end up through the small loop from underneath.
-
 Step 3 / 5
Around the standing part
Pass the end behind the standing part and bring it back round to the front.
-
 Step 4 / 5
Back down the loop
Push the end back down through the small loop, alongside the part that came up.
-
 Step 5 / 5
Tighten
Hold the end against the side of the big loop and pull the standing part to set the knot; the end finishes inside the loop.
No. 04
Clove Hitch
Ties a line quickly to a post or a rail with two crossing turns. Shop the Clove Hitch pieces
No. 04 · Clove Hitch
-
 Step 1 / 4
Wrap the post
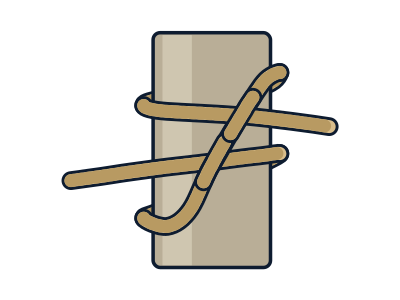
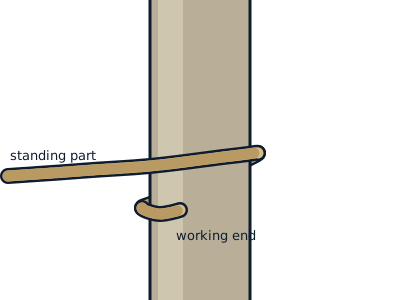
Lay the working end across the front of the post and take it around the back, bringing it out below the standing part.
-
 Step 2 / 4
Cross over
Bring the end diagonally up across the front, over the standing part, and around the back of the post again.
-
 Step 3 / 4
Tuck under
Bring the end out above the first turn and tuck it under the diagonal, so it leaves in the opposite direction to the standing part.
-
 Step 4 / 4
Pull tight
Pull both ends to snug the two turns together. The front shows an X with both ends coming out from under the diagonal; the back shows two parallel turns.
No. 05
Sheet Bend
Joins two lines, even when one is thicker than the other. Shop the Sheet Bend pieces
No. 05 · Sheet Bend
-
 Step 1 / 5
Make a bight
Fold the end of the thicker line (tan) back on itself to form a bight.
-
 Step 2 / 5
Through the bight
Pass the end of the thinner line (blue) through the bight from behind.
-
 Step 3 / 5
Behind both legs
Take the blue end around behind both legs of the bight.
-
 Step 4 / 5
Tuck under itself
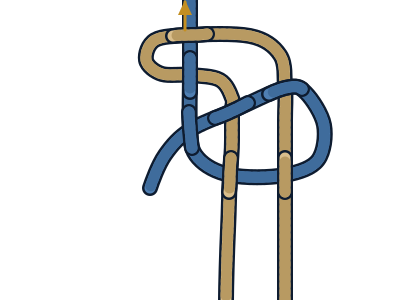
Bring it back across the front of the bight and tuck it under its own standing part, not through the bight.
-
 Step 5 / 5
Tighten
Hold the bight and pull the blue standing part to set the knot; both short ends should finish on the same side.
No. 06
Monkey's Fist
Wraps the end of a line into a neat, round ball of turns. Shop the Monkey's Fist pieces
No. 06 · Monkey's Fist
-
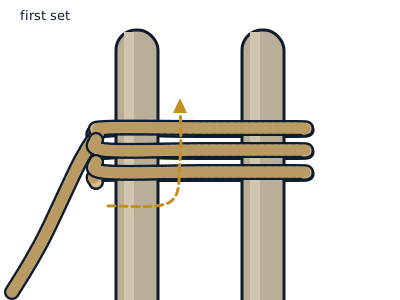 Step 1 / 5
First three turns
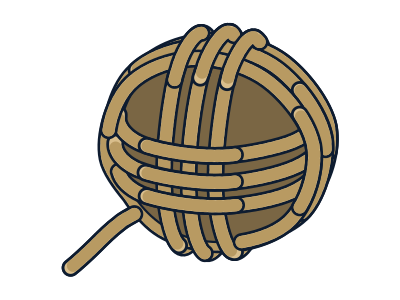
Spread two fingers and wrap the rope three times around both, laying the turns side by side.
-
 Step 2 / 5
Second three turns
Wrap the end three times around the first set, passing it through the gap between your fingers so the new turns cross the first ones at right angles.
-
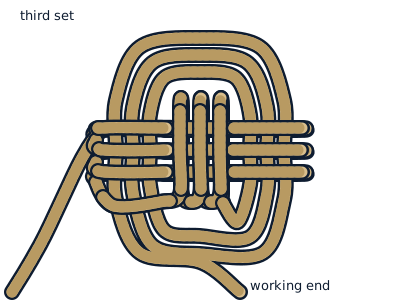 Step 3 / 5
Third three turns
Slide the knot off your fingers. Pass the end three times through the inside of the first set and around the outside of the second set.
-
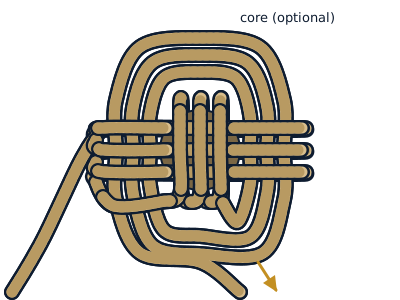 Step 4 / 5
Add a core
For a firm ball, push a marble or small ball into the centre, then tighten each turn in order, working the slack along to the end.
-
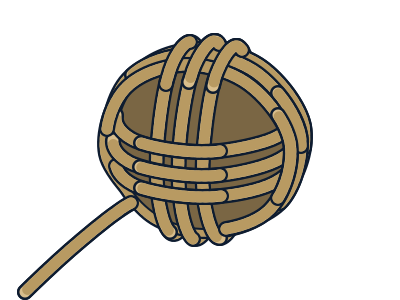 Step 5 / 5
Finish the fist
Keep working the slack through until all nine turns sit snugly round the core, then tuck the end into the knot or splice it to the standing part.
No. 07
Carrick Bend
Joins two heavy lines; when laid flat it shows an even, woven pattern. Shop the Carrick Bend pieces
No. 07 · Carrick Bend
-
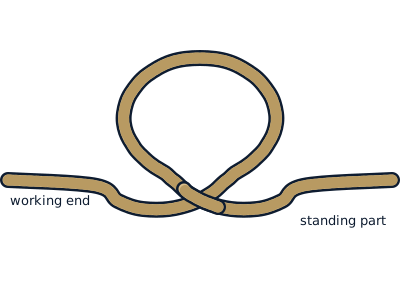 Step 1 / 5
Make a loop
Form a loop in the end of the tan line, with its working end passing under its standing part.
-
 Step 2 / 5
Under the loop
Lay the blue working end under the whole tan loop, entering on one side and coming out on the other.
-
 Step 3 / 5
Over, then under
Take the blue end over the tan standing part, then under the tan working end.
-
 Step 4 / 5
Over, under, over
Finish the weave: over the tan loop, under the blue line itself, then over the tan loop again. Every crossing should now alternate over and under.
-
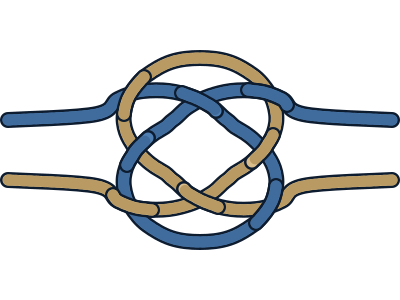 Step 5 / 5
Even it up
Pull the four parts gently to even the weave. The two working ends should come out on opposite sides of the knot, diagonally across from each other.
No. 08
Overhand Knot
The simplest knot: one loop with the end passed through it, the base of many other knots. Shop the Overhand pieces
No. 08 · Overhand Knot
-
 Step 1 / 4
Make a loop
Form a loop near the end by crossing the working end over the standing part.
-
 Step 2 / 4
Tuck the end
Take the working end around behind the standing part and bring it up through the loop from the back.
-
 Step 3 / 4
Pull through
Draw the end out through the loop; the rope now crosses itself three times in an over-under pattern.
-
 Step 4 / 4
Tighten
Pull the working end and the standing part in opposite directions until the knot sits snug.
No. 09
Turk's Head
A decorative woven ring of rope, tied around a rail, a handle or a wrist. Shop the Turk's Head pieces
No. 09 · Turk's Head
-
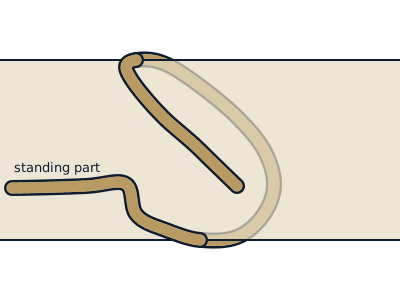 Step 1 / 5
First round
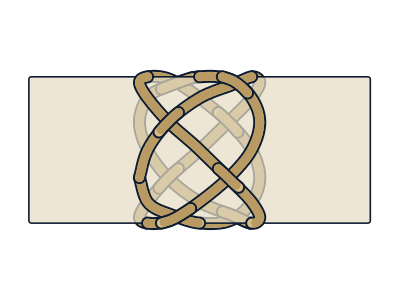
Lay the rope once round a rod or your hand in a long diagonal turn, as shown; nothing is tucked yet.
-
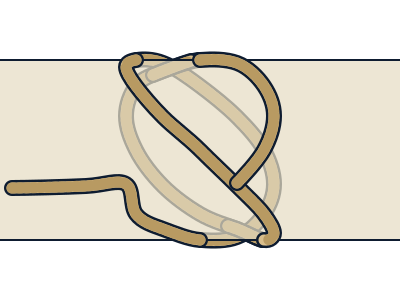 Step 2 / 5
Second round
Carry on round in the same direction. Each time you meet the first round, pass under it.
-
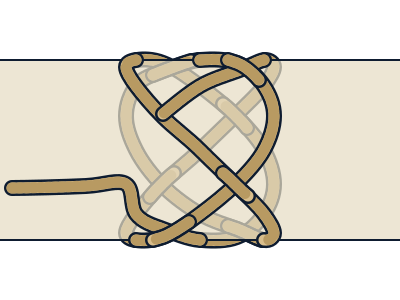 Step 3 / 5
Third round
Go round once more, alternating under and over at every crossing: under, over, under, over, under, over.
-
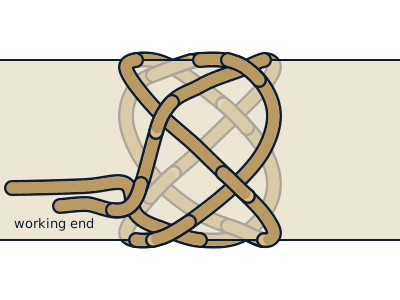 Step 4 / 5
Close the ring
The end now arrives beside the standing part. Every crossing should alternate; you have a 3-lead, 4-bight Turk's head.
-
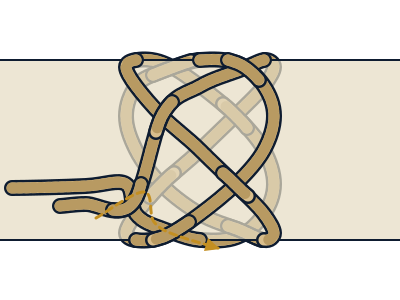 Step 5 / 5
Double and tighten
Lead the end round again alongside the first pass (two or three passes for a bracelet), then work out the slack and slide it off.
These cards show how to tie each knot as a piece of jewellery or for practice. They are not instructions for climbing, sailing, lifting or any safety-critical use.